Satellite TV is the future and we have decided to give a simple but complete guide on how to install or set up a satellite dish and decoder for TStv, DStv, Kwese, MyTV, Startimes, Multi TV as well as Free to Air cable TV like Strong etc.
If you already have any Free-To-Air Satellite system active, scroll down to How To watch TStv free for the month of November and get the configurations to use in your FTA decoder.
Hot Update: TSTV Decoder now Officially on Sale - See Details
The advantage of knowing how to install it yourself is that in case of poor signal or obstruction or displacement of initial position, you can set it up yourself for best quality pictures and without any bug.
This may also come in handy for new installations, adjusting dish positions and/or when relocating to a remote area.
Following this guide step by step will help you install and setup your Satellite TV Dishes without the usual missing channels, poor signal and related issues that happens as a result of low technical know-how for installing satellite dishes.
Tools Needed
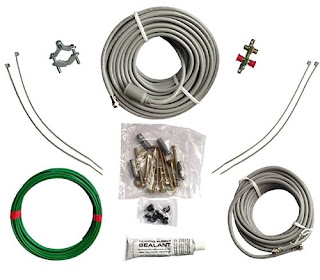
- The Satellite dish and components ie Reflector (Dish), LNBF (Head) and Decoder. (Usually sold together).
- Hammer
- Nails – 4 Pieces of 3-inches nails
- Spanners – 10/13, and 14/15 combination, flat or ring spanner(s)
- Cable Clips – 1 packet of cable clips (the one with nails)
- Screwdriver
- Cutter (or electric pliers)
- Black Solution Tape (cellotape).
- F connectors (a minimum of 2) and Coaxial cables (1 full roll of Coaxial cable is about $6 NGN1,500,)
- A digital satellite signal meter (We used a strong decoder and so will be using it for references throughout this tutorial).
How to Setup the Satellite Dish
1. Know the direction for the Satellite Provider you intend to use. For TStv and DStv, find a West facing position for best signals.
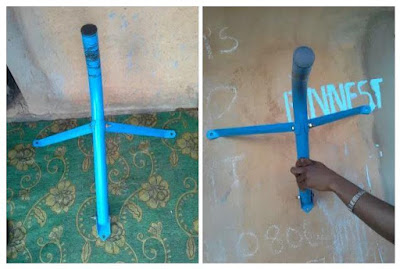
2. The arrangement of the dish components depends on where you intend mounting it on. If you are going to mount it on a root, wall or wooden fetcher board of the building, look at the image below for how it should be coupled in order to make it easy to receive signals and withstand strong wind.
3. If you intend to mount it on a pipe, make sure the footing is strong, well cemented and grounded.
4. Fit in the screws and nuts in the reflector’s (dish) rear and connect the LNBF accordingly. See images below for the tips.
5. After mounting your satellite dish correctly and firmly, you can go ahead to the next step on how to configure the decoder and activation.
How to Configure the Decoder, Activate smart card and free-to-air channels for first viewing
1. You will put your digital satellite signal meter to use here.
2. Plug the Coaxial cable into the Lnbf base of the main dish assembly and then plug the other end of the cable into the LNB in (Antenna) port in the back of a digital satellite signal meter or a strong decoder.
3. Do the dish alignment by locating east, west, points and degrees depending on the satellite tv provider you intend doing the setup for.
How To watch TStv free for the month of November, use the following configuration.
Any 90cm Dish and any FTA HD decoder like strong, QSAT etc can track TStv free channels.
The angular position, polarity and transponder values for TStv (Free to Air);
Position: Position: ABS 3A @ 3° West
Frequency: 11052 or 11088
Symbol rate: 30000
Polarisation: H
LNB Position: 4 'O' Clock
TRACKING TP 11167 H 30000
TStv Free-to-air Channels
Once your TStv satellite dish is installed correctly, all TStv channels will show in clear qualities as they are free-to-air channel for all TStv satellite dish owners for the month of November.
Channels scan.
1. From your decoder remote control, find Menu and then select installation. Enter 0000 as the password and Select manual scanning and then enter your satellite provider’s values as listed above Eg. transponder frequency and the rest.
2. Once the link is established, the signal power and quality meter will start reading.
3. Start rotating your reflector (dish) up/down and side ways around 36 degrees east (you may have to check the alignment of your neighbor’s dish for tips or read directly from your digital satellite signal meter).
4. Watch the signal power and quality and tighten the dish strongly once you are able to get values higher than 60% (We got 89% for ours).
5. Once a good signal quality is ascertained, your satellite dish is all setup.
6. Disconnect the LNB-in from your strong decoder (or digital satellite meter) and connect it to the TStv decoder.
7. Select English from the language options, E36A-B from the next window and Universal for LNB type.
8. Hit scan to install and complete the channels setup.
Note: If you are using a digital signal meter, the scan option won’t be necessary. All you need do is, connect the LNB-in to the meter and enter the frequency, polarization and symbol rate values while aligning the dish for best signal quality.
Satellite Dish Signal Troubleshooting Tips
If you are experiencing very poor reception, distorted audio and poor visual rendition, these tips will help you improve the signal reception
Here, you won’t need a digital meter or strong decoder as the built-in signal tunar function that comes with Satellite dish decoders will suffice.
How to improve Satellite TV signals
- Position your Television where you can see from outside or ask someone to be monitoring the signal strength for you while you turn the satellite dish to various angles
- Turn on your Decoder and TV and press the Help button on your remote control.
- Scroll down to general information and then Tuner Status to your right.
- Click to the Tuner status and use that to setup your satellite dish for best delivery.
- Make sure the signal strength is between 60 and 98, this range would be hardly disturbed by rain and/or poor weather.
Bonus
The angular position, polarity and transponder values for DStv (Free to Air);
Track Eutelsat w4/7
Transponder Frequency: 12245
Symbol rate: 27500
Polarisation: H


Do you have any video of that? I'd love to find out some additional information.
I use the tracking tp and I got signal but it did not show TStv but it was showing betnaija.
I put the frequency 11052 and 11088 with same symbol rate 30000 it did not work.
How do I get digital satellite tracker and how much will it cost?
I will like to have a video of the tutorial. Tnks